Showing posts with label kid's activities. Show all posts

Saturday, August 17, 2013

I made an 'eye spy' bag!


I happened across some pictures of 'eye spy' bags on the internet many months ago.  Ever since then I've been meaning to come up with a pattern to make one of my own.  I finally got around to it the other day.  It took a bit of experimenting (including almost finishing one before I realised that the plastic was too thick to topstitch through!)  but I'm very happy with how this one has turned out.  There's a layer of plastic on the front and the back so it is surface washable (very important in our house as everything seems to get grubby from little hands!) 

The idea behind 'eye-spy' bags is that kids have to look in the window and move the rice around inside to find 'trinkets' which can be easy or hard depending on the size of each trinket!  There's a laminated list attached to a ribbon on the bag that tells the kids what to find.  I made it in the hopes that the kids would use it in the car on long trips but it didn't quite work that way.  They were very interested in doing it when I first made it but then ended up losing interest before our 5 hour trip to Hotham!!

Sunday, December 11, 2011

Christmas Angels


These Christmas angels are very easy to make (although may require some adult help for construction) and look great. The kids had a really fun time decorating them and can't wait to hang them on the Christmas tree (when we finally get around to getting our Christmas tree that is!)

What you will need:

Thin cardboard
silver foil
small Styrofoam ball
small paper doilies
toothpicks (if desired)
black texta
scissors
glue or sticky tape
glitter or tinsel
ribbon or wool
pin

How to make it:

Draw a circle with a diameter of about 20cm on the cardboard and cut out (I just traced around a bread plate).

Cover with silver foil (or you can leave it plain).

Cut a slit into the centre of the circle.

Roll the circle into as tight a cone as possible.

Get the kids to decorate!

Fold the doily in half and glue to the back of the angel.

Use black texta to draw a face on the styrofoam ball (older kids could do this themselves but mine couldn't). Poke the toothpick into the ball and put through the top of the cone (you may need to make the hole bigger). Glue into place.

Make a halo for the angel out of tinsel and glue onto head.

Attach a loop of ribbon or wool and pin to the angel's head (if you want to hang them on the christmas tree!)

Esme busy putting glitter on her angels - we like a lot of glitter in this house!!

Jacob chose to cover his in silver foil first then put glitter and tinsel on

Esme with her finished angels, very proud of her work!

Jacob with his finished angels

It's a great way to keep the kids entertained - Jacob spent ages doing his (although can't say the same about Esme - she was more interested in what Daddy was doing outside!)

Saturday, October 15, 2011

'Beautiful Birds' at Healesville Sanctuary

As Friend of the Zoo (FOTZ) members we are given the opportunity to attend special activities at the different zoos across the year. There are usually a few activities for kids to attend so when we see something that will interest our kids we book them in.

Today's activity was at Healesville Sanctuary and the theme was 'beautiful birds'. FOTZ volunteers read the kids a variety of books about Australian birds and then the kids made a bird feeder to take home and hang in the garden. We've made bird feeders before but this was a slightly different way of making them.

The kids had a great time making these bird feeders and getting messy - glucose syrup is very sticky as Esme found out!

The finished bird feeder - we look forward to hanging them outside when they dry!

Just in case you want to have a go at making these, here's the recipe.

Wild Bird Feed Treats

Ingredients
3/4 cup flour
1/2 cup water
3 tbsp glucose syrup
4 cups birdseed and peanuts, fruits, berries, raisins or anything else the birds enjoy

Method
Mix together and place in a disposable cup with a wire hanger
Leave to dry overnight
Hang in a tree for the wild birds to enjoy!

We ended the session with afternoon tea and then took the kids to see a few of the other animals before we headed home. I really do love being FOTZ members, it means we can just pop into any of the zoos without having to justify the cost by staying all day!

Friday, September 2, 2011

Jungle Safari


I always like having a craft activity for the kids to do at parties. I find that often having a structured activity can help a quiet child feel more at ease at a party (I'm thinking specifically of my own children here who often become overwhelmed at parties where there are lots of people). Alternatively, it can help a child who has lots of energy focus and calm down.

Esme's birthday party this year had a jungle theme so our craft activity was to make some binoculars to take on our jungle safari. Here's how we made them:

What you will need:

Toilet rolls
Masking tape
String
Cellophane
Textras, glitter, sequins, etc for decorating

How to make it:

Get the kids to decorate two toilet rolls.

Cut out two circles of cellophane approximately the same size as the holes of the toilet rolls. Use masking tape to stick on the ends of the toilet rolls.

Use masking tape to stick the toilet rolls together.

Cut a piece of strong big enough to hang around the kid's neck. Use masking tape to stick on each side of the toilet roll.

One of the party games was to go on a 'safari' and find animals hidden outside (I had some cheap plastic animals that I purchased off ebay). The kids were able to use the binoculars they had made to help 'find' the animals.

Jacob was so intent on using his binoculars to spot animals that the other kids had already found most of them before he got to them!

All of the kids had lots of fun making their binoculars and then getting to find the animals.

Sunday, May 29, 2011

Homemade Facepaint

We've been experimenting with homemade facepaint here recently. It all started because I was doing a theme about clowns with the kids I taught at school. I wanted them to experience having their face painted like clowns. There are quite a few allergies among the kids I teach so I didn't really want to purchase commercial facepaint as I wasn't sure what sort of 'extras' it would have in it.

This facepaint is what we came up with. It is made using a combination of sorbolene (we used a good quality sorbolene from the chemist which didn't contain any sort of 'extras'), cornflour, water and food colouring. It works well although it is quite thick. It also doesn't last long. As soon as it is dry it tends to flake off (although I personally prefer this to having to scrub faces to get facepaint off!)

Jacob with his moon and star (he had a cold hence looking like he had been crying!)

As you can see from the pictures, I need a little more practice with my artistic skills ;) However, the kids enjoyed having their faces painted and happily sat and had them done.

Esme asked for a heart on her cheek

Here's the recipe for anyone interested:

Facepaint:

1 tbsp sorbolene
2 tbsp water
6 tbsp cornflour
food colouring

Mix sorbolene with water, gradually add cornflour (don't do this too quickly or else you will get a lumpy mixture). Add food colouring as desired.

That's it really - a simple, no-fuss way to make facepaint!

Sunday, May 8, 2011

Handmade Mother's Day Gifts

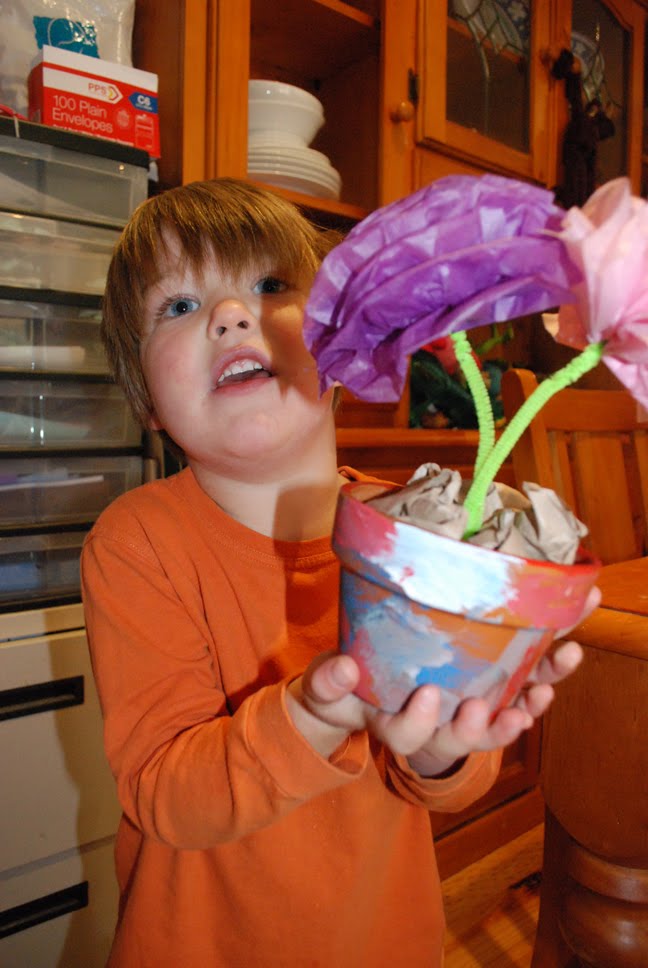
I've written before about why we choose to only give handmade gifts for Mother's Day so I won't bore you with the details again. This was my present from the kid's for Mother's Day this year - a flower pot painted by them complete with paper flowers. I love it and it looks so pretty on my bedside table!

Hand painted flower pots for Nanny and Nanna.

We also painted flower pots for Nanny and Nanna as well this Mother's Day. They were very easy for the kids to do. All we did was cover them with a layer of PVA and let them dry before we painted them so they were water proof.

Jacob was very proud of the pot he decorated!

We made some paper flowers to go in the pots too. These paper flowers were really easy to make and look really effective. We used the instructions from here although I cut the squares a lot smaller than what they recommend.

Happy Mother's Day to all the other Mums out there!

Monday, May 2, 2011

Autumn Garlands

It's Autumn here at the moment and the kids and I have been enjoying watching the leaves on the trees slowly change their colours. We drove home today past some trees which had some really lovely coloured leaves on them. Out of the blue, Jacob asked if we could stop and collect some. How could I say no to that request? The above picture is just some of the leaves we collected: all kinds of beautiful shades of red, orange and yellow.

Threading the chain of leaves together

We decided to make ourselves some garlands using the leaves. I learnt how to make these garlands in the first year of taking Jacob and Esme to Steiner Kinder. They are so easy to make and lots of fun! All you need to do is take a stem off a leaf, overlap two leaves, then thread the stem through both leaves. Keep going until you have a chain of leaves and then you can join the two ends together to make a garland.

Jacob proudly wearing his garland

Jacob was so proud of his garland. Esme's didn't last long (which is what usually happens around here) before the leaves were thrown around the house. But I don't really mind seeing she had lots of fun doing it ;)

Esme's garland - before it was taken apart ;)

And of course one creative activity leads to another...Jacob decided he wanted to paste some leaves onto a piece of paper as a present for Nanny and Pa (shhhh, don't tell them ;))

Pasting Autumn Leaves onto paper (or in Esme's case, putting glue on a piece of paper!)

We Play

I am joining in with the 'We Play' link up over at Childhood 101 this week. Come join me!

Saturday, April 16, 2011

Egg Heads

Jacob (and Esme!) were given some wheat from his Kinder teacher as an Easter present. Jacob has been asking to plant it since we got it so today we planted it in some old egg shells. We used some batik eggs that didn't survive after being handled by Esme and a couple of Silkie eggs that had already been blown. We drew some faces on the plain eggs - Jacob chose a happy face and Esme chose a sad face.

We put some cotton wool into the egg shells and then sprayed the cotton wool to make it moist.

In goes the cotton wool.

Esme, concentrating intently on getting the water into her egg shells!

We then placed lots of wheat on top of the cotton wool and gave them a good spray of water.

Putting the wheat into the egg shells.

Lots of fun for the kids to do and very easy! We're all looking forward to watching the wheat grow and seeing our egg heads.

Easter Teach/Learn Blogging Carnival

This post is part of the Teach/Learn Carnival, April’s theme is Easter. If you would like to join in submit your own post here, or check back at just before Easter for the links to lots of great posts.

Friday, April 15, 2011

Batik Eggs

I had my first attempt at making batik eggs at Steiner Playgroup the other day. Batik Eggs are made by dripping melted wax onto an egg and then dyeing them. I have to admit that my attempt at playgroup yielded much better results than the ones above (possibly because we used a good quality dye and candles!) but I think the ones we did at home still turned out alright in the end. We used blown eggs for this activity so we can keep the eggs. The eggs we made at home were make using generic food dye, a normal old candle (which was possibly a bit thick) and some white Silkie eggs (white eggs work better with the dye).

Here's how to make them:

STEP 1: Prepare the dye

To make the dye I mixed 3/4 cup warm water, 1 tbsp of vinegar and 1/4 teaspoon food dye. I made four different colours: yellow, red, green and blue. The colours are achieved by dipping the egg in a succession of different coloured dyes.

STEP 2: Drip melted wax onto the egg

Put a few drips of wax onto your egg. You can choose whether to drip dots of wax on the egg or just let it run wherever. The two eggs on the left in the first picture are made by dripping wax onto the egg (although not very successful attempts given my candle was a bit too thick!) while the other two were made by letting the wax run wherever. Remember that you will be putting more wax on to make different coloured patches as you go along so you don't need too much wax for the first layer.

STEP 3: Dip the egg into the dye

After the first layer of wax is on dip the egg into the dye. You will need to leave it in there for awhile and move it around slowly to allow the dye to penetrate. I usually start with yellow and then move to darker colours as I go on (this is the bit where you end up with interesting coloured fingers as you can see!)

STEP 4: Repeat the process

Once you have done the first layer repeat with more wax drips leaving the previous wax on. Dip the egg into the next dye colour (I chose red). Repeat the process with the wax and dye until you have used all the colours or you are happy with the colour (the more colours you dye the more coloured patches you will get).

STEP 5: Remove the wax

Once you are happy with how the egg looks you can remove the wax. This can be done by gently picking the wax off (be careful though as it can scratch the dye and leave marks). For bits that are hard to get off you can hold over the candle flame until melted and gently rub into the egg (this leaves a nice polished coating on the egg too)

This is a fun activity to do but it does take a lot of time. It took me a couple of hours to do these four eggs. Jacob and Esme were very interested in watching it to start with but it didn't take them long to get bored! Kids will also require close supervision when you are doing this activity.

Easter Teach/Learn Blogging Carnival

This post is part of the Teach/Learn Carnival, April’s theme is Easter. If you would like to join in submit your own post here, or check back at just before Easter for the links to lots of great posts.

Monday, April 11, 2011

Handprint Chicken


With Easter coming up soon, what better thing to make than a chicken? This also ties in with our farm theme. The kids had a great time with this activity. They especially loved having their hands traced around to make the wings and combs and gluing the feathers on to decorate their chicken.

What you will need:

White, red and orange cardboard
Google eyes
Feathers
Pen/pencil
Glue

How to make it:

Cut out a big circle and a small circle from the white cardboard.

Trace around kid's hands - once on the red cardboard and twice on the white cardboard. Cut out.

Cut out legs and beak from the orange cardboard. Cut out piece for above the beak from red cardboard.

Glue the two circles together. Glue red hand print on top for comb and white hand prints on sides for the wings. Glue legs and face bits on.

Glue feathers on body.

Jacob has his hand traced around to make the chicken's 'wings'

All the bits we need to make a chicken. Jacob can't wait to get started!

Esme glues some eyes onto her chicken

The feathers were a big hit too!

Esme proudly displays her chicken - look at all those different coloured feathers!

Esme was very taken with her finished chicken. It's actually still in one piece so I think that just shows how much she likes it ;)

Easter Teach/Learn Blogging Carnival

This post is part of the Teach/Learn Carnival, April’s theme is Easter. If you would like to join in submit your own post here, or check back at just before Easter for the links to lots of great posts.

Monday, March 28, 2011

Paper Plate Pig

We've started on a a bit of a 'farm theme' lately. I have also been doing this with the students I teach at school. I'm planning on making different farm animals each week with the idea to make a personalised book for the kids when we are finished. We'll see how we go! This week we have been making pigs.

What you will need:

Paper plates
Toilet rolls

Cardboard cut out in the shape of ears
Egg carton

Google eyes

Pipe cleaner

Paint
Glue
Scissors
Black Texta
Sticky Tape

How to make it:

Get the kids to paint all the different parts: back of paper plates, both sides of ears, toilet rolls and egg carton.

When dry, poke a hole in the back and put the pipe cleaner in for a tail. Sticky tape in place.

Glue ears onto paper plate then glue plates together. Glue on egg carton for nose and google eyes. Draw on mouth.

Cut slits in both sides of toilet rolls and push the plate into them. Glue into place.

Esme paints her plate - we do painting in the nude around here - it saves a lot of washing!

Sitting at the table together happily making their pig

Jacob glues the eyes on the pig

The kids really enjoyed making these - it held their concentration for ages!

Visit We play at Childhood 101 for more great play ideas!

Monday, March 7, 2011

Dog Biscuits


No, they're not really dog biscuits! But we had fun pretending they were. Seeing as we've had a bit of a dog theme recently we decided to make these biscuits and cut them out in the shape of bones. The biscuits were really yummy, the recipe was similar to that of cheese scones. The kids had a lovely time making them.

Jacob grates the cheese for the biscuits

Esme adds the milk

Jacob cuts out some shapes

Esme's favourite part - eating the dough before it is cooked and licking the flour. Don't know how it can be so appetizing but she ALWAYS does it no matter what we cook!

Here's the recipe if anyone wants to make some!

Dog Biscuits


Ingredients
1 1/2 cup plain flour
2 tsp baking powder
1/2 cup grated cheese
2/3 cup milk
2 tablespoon butter

Method
1. Soften the butter to room temperature. Mix all of the ingredients to form a soft dough
2. Turn the dough onto a lightly floured surface and knead
3. Roll dough out, cut out using cutters and place on a greased tray.
4. Brush the biscuits with a little extra milk and cook in the oven at 200 degrees for 20 minutes or so.
Related Posts with Thumbnails