Showing posts with label food glorious food. Show all posts

Sunday, December 1, 2013

Strawberry Santas (the dairy-free version!)

Dairy-free, gluten-free, soy-free, sugar-free


I've seen photos of these strawberry Santas going around a lot lately.  They look  really great.  The only problem is that the ones I've seen are made with whipped cream and Jacob can't have dairy.  So we came up with our own solution - cashew nut cream!  I've posted my recipe for cashew nut cream before.  It makes a great filling for strawberry Santas.  You will need to add slightly less coconut milk to this recipe though to make these.  The cashew nut cream needs to be a pipe-able consistency otherwise they will just collapse.

Ingredients
20 strawberries
2 quantities cashew nut cream (with slightly less coconut milk) 
a handful of black chia seeds

Method
Slice off the leafy end of the strawberry so the strawberries sit flat.
Then slice off the tip to make a hat. 
Put your cashew nut cream into a piping bag and pipe swirls on the top of the strawberry base. Replace hat.
Add a dollop of cashew nut cream to the top of the hat and down the Santa's front. 
Add two chia seeds to each Santa for eyes (we actually used flaxseeds as we didn't have black chia seeds!)

Enjoy! 

Saturday, August 17, 2013

Anzac Biscuits

Dairy-free, gluten-free, soy-free, egg-free


Ingredients
1 cup blanched almond flour
1 cup GF rolled oats
1 cup dessicated coconut
1/2 cup rapadura sugar
1 tsp cinnamon
1/4 cup coconut oil
2 tbsp golden syrup
1/2 tsp bicarb soda
1/4 cup hot water

Method
Preheat oven to 180 degrees.  Line 2 trays with baking paper.
In a mixing bowl combine your almond meal, coconut, rapadura, cinnamon and oats.
Melt the coconut oil and golden syrup in a small saucepan.
Combine the bicarb and water then add to the coconut oil and golden syrup.
Add the frothy mix to your dry mix and combine it well.
With wet hands, shape small balls of the dough.
Place them onto the tray and press down to flatten them a little.  Bake for 20-30 minutes or until golden brown.

Original recipe from this blog but I have made some alterations in my version.  

Thursday, May 23, 2013

Chocolate Chip Biscuits

Dairy-free, gluten-free, soy-free, no refined sugar*


Ingredients
2 1/2 cups blanched almond flour
1/2 tsp sea salt
1/2 tsp baking soda
1/2 cup oil
1/2 cup agave nectar
1 tbsp vanilla extract
1/2 cup chopped dark chocolate*

Method
Preheat oven to 180 degrees.  Line 2 baking trays with baking paper.
In a large bowl, combine the almond flour, salt and baking soda.
In a medium bowl, whisk together the grapeseed oil, agave nectar, and vanilla extract.
Stir the wet ingredients into the almond flour mixture until thoroughly combined.  Fold in the chocolate, then place the dough in the fridge for 20 minutes.
Spoon a heaped tablespoon onto the tray and press down firmly with your hand to flatten.
Cook for about 20 minutes or until slightly golden.  Leave to cool before serving.

*These biscuits will be sugar-free if using vegan chocolate like the Loving Earth brand or my hubby's own raw chocolate.  

This recipe is from Elana's Amsterdam's 'Gluten-Free Almond Flour cookbook'.  Check out her blog too - there's lots of other recipes suitable for those with allergies. 

Sunday, December 30, 2012

Cashew nut cream

Dairy-free, gluten-free, soy-free, sugar-free


Cashew nut cream is an all round favourite in our house.  We use it as a sweet dip for fruit and as a replacement for yoghurt and cream seeing Jacob can't have dairy.  It's amazing how yum it is with just a few simple ingredients.   

Cashew Nut Cream 

Ingredients
115g raw cashew nuts
125ml coconut milk
1 tablespoon maple syrup, or to taste
1/2-1tsp natural vanilla extract, or to taste

Method
Soak the nuts and 1/2tsp of salt in a bowl of water overnight at room temperature.
Strain the nuts and rinse well.  Add the remaining ingredients and process until very smooth (the thermomix is great for getting it really smooth!) Adjust the sweetness with maple syrup and vanilla, as desired.  The cashew nut cream will keep for a week in the fridge.

Recipe originally from Jude Blereau's 'Wholefood for children'. 

Wednesday, December 26, 2012

Apricot balls

Dairy-free, gluten-free, soy-free, sugar-free


Apricot Balls

Ingredients
2 cups cashews
1/4 cup coconut
1 tsp vanilla extract
200g dried apricots
1 tbsp coconut oil
extra coconut for dusting

Method
Place cashews, coconut, vanilla and apricots into thermomix.  Blend until finely ground (about 1 minute on speed 6) 
Add the coconut oil and mix until it comes together.
Roll into small balls and dust with coconut

Sunday, November 18, 2012

Daddy made swirly bread!


Now that Jacob is gluten-free we've had to come up with bread alternatives for him.  Chris has always made our bread for us but gluten-free bread has presented him with some ummm, shall we say challenges?!  It's very sticky and hard to work with.  And it's pretty tasteless compared to regular wheat bread (although Chris is working on improving that too!)  Jacob is also very fussy about his food and finds it hard when things change (that's a kid with ASD if ever I saw one!)  The first loaf of plain white GF bread Chris made we were told tasted like poo (now there's a nice image!) but I did notice that Jacob kept eating it....Anyway, Chris used to make a marbled rye loaf that Jacob absolutely loved.  He would always request that Daddy made 'swirly bread'  When Jacob knew that he had to have special bread he asked Daddy if he could make him his own swirly bread.  And so good old Daddy agreed to attempt it.  The above photo is the end result.  I think he's done an awesome job.  And swirly bread has now become a staple in the freezer for Jacob.  I thought I'd share the recipe in case anyone wanted to give it a go...

SWIRLY BREAD

Gluten-free, Dairy-free, Soy-free

This recipe makes two standard sized loaves.  The instructions are for two doughs - a white and a brown - which will be put together to create a marbled bread. 

Ingredients

White bread
520g gluten free white bread flour blend*
300g lukewarm water
2 tsp dried yeast
1 tsp salt
1 tbsp caster sugar
1 egg
2 tbsp vegetable oil
1 tsp vinegar
1 egg, beaten, for brushing
60g seed mix (sesame, pumpkin, sunflower and flax seeds)

Brown bread
500g gluten free white bread flour blend*
310g lukewarm water 
20g cocoa
2 tsp dried yeast
1 tsp salt
1 tbsp caster sugar
1 egg
2 tbsp vegetable oil
1 tsp vinegar
1 egg, beaten, for brushing
60g seed mix (sesame, pumpkin, sunflower and flax seeds)
Method 
Grind the seeds into a powder. 
In a large bowl combine the dry ingredients
In another bowl combine the wet ingredients.
Add the wet ingredients to the dry and mix
Knead until the dough comes together (add more flour if needed).
Split the white bread dough into two and the brown bread dough into two (you will need one of each colour per loaf). 
Roll each piece of bread dough into a rectangle roughly the width of the bread tin. 
Place the brown bread dough on top of the white.
Roll into a tight spiral.  Place roll in tin, cover and leave to rise until doubled in size (approx 90mins)
Brush top with beaten egg.
Bake at 220C for approx 40mins or until golden brown.  

*we make our own bread flour blend by combining 450g white rice flour, 115g potato flour, 60g tapioca flour, 60g cornflour and 4 tsp xanthum gum. 

Tuesday, October 16, 2012

Raspberry and Coconut Muffins

Gluten-free, Dairy-free, Soy-free


Now that Jacob is on a gluten-free, dairy-free, soy-free diet, you'll probably be seeing quite a few recipe posts like this as I experiment with new recipes.  As soon as I saw the recipe for these muffins I knew I wanted to make them.  The original recipe is dairy-free but not gluten-free so I had to make some adjustments.  Replacing the wheat flour with GF flour (we make our mix of GF flour using rice flour, potato flour and tapioca flour) was easy enough.  But I also halved the recipe and added an extra egg so it wouldn't be so crumbly with the gluten-free flour. Here's my adjusted recipe...

Raspberry and Coconut Muffins

Ingredients
1 cup GF flour 
1/2 cup castor sugar
2 1/2 tsp baking powder
2 eggs
1/4 cup oil
3/4 cup coconut cream
1/4 cup shredded coconut
1 cup raspberries

Method
Preheat oven to 200 degrees.  
Put everything except for the raspberries and shredded coconut into a bowl and mix really well.  
Add the raspberries and coconut and mix gently until just combined.
Spoon into patty pans and cook in oven until brown and a skewer comes out clean.  
Leave in tin for 5 minutes and then remove to a wire rack to cool.  

Enjoy!

I don't particularly like the texture of GF flour but I didn't have a problem with these muffins.  I think the coconut cream made them really moist and not dry like gluten-free things tend to be. Next time I make them I will try substituting the castor sugar with 1/4 cup coconut sugar instead so there's not so much processed sugar in them. 
 

Wednesday, December 14, 2011

Christmas Cookies

This recipe comes courtesy of the cookbook my mother-in-law put together for us as a wedding present. They make really yummy, chewy biscuits. I put red and green glace cherries in to make them look more Christmas-y.

Ingredients

125g butter
1 cup sugar
1 egg, lightly beaten
2tsps vanilla essence
1/4 cup milk
1 1/4 cup plain flour
1/2tsp bi-carb soda
90g nuts, chopped (I used pecans and slivered almonds)
125g choc chips
90g shredded coconut
90g sultanas
90g glace cherries, chopped


Method

In a bowl, cream the butter and sugar until light and fluffy. Beat in egg, vanilla and milk.

Sift together flour and bi-carb and stir into butter mixture. Add nuts, choc-chips, coconut, sultanas and cherries and mix well.

Place heaped teaspoonfuls on a greased biscuit tray (or line with baking paper), bake at 180 degrees for 15 minutes or until golden.

Remove from oven and let cool on tray for 10 minutes before putting on a wire rack.


Enjoy :)

Monday, October 3, 2011

Muesli making Monday

We love homemade muesli in this house and go through it quite quickly. So Mondays in our house have officially been declared 'muesli making Mondays' and we make a fresh batch of muesli to last us the week. After making it for so many months, I have had lots of time to perfect our recipe! Our basic recipe is this:

MUESLI

Ingredients

4 cups rolled Oats
2 cups processed Bran
1 cup Oat Bran
1/2 cup shredded coconut
1./2 cup flaked almonds
1/2 cup pumpkin kernels
1/2 sunflower seeds
90g butter
90g honey

Method

Combine dry ingredients.
Melt butter and honey, add to dry ingredients and mix well.
Spread on a tray and cook in oven at 180 degrees for 15 minutes.
Stir muesli and cook for a further 15 minutes or until nicely browned.

We all like different dried fruit with our muesli so I store it plain in a container. Then we all add the fruit we want each morning. I have a cupboard full of dried fruit (some of it dried by us in our dehydrator)

My favourite way to have it though is with dried apples and homemade yoghurt - yum!

How do you do your muesli?

Saturday, August 6, 2011

Homemade Chocolate Hazelnut Spread

I just had to share this photo of the yummy chocolate hazelnut spread I made today. When I first saw the recipe for this over at The Spunky Coconut I knew I had to make it! I absolutely love Nutella but it contains a lot of added 'extras' that are not so good. This recipe uses all natural ingredients and, surprisingly, tastes pretty much the same as Nutella - if not better! The texture is not quite as smooth as Nutella but that is probably due more to our food processor than anything else.

Now my problem is trying not to eat all three jars of this at once!!

Sunday, April 24, 2011

Our Easter (in pictures)

We woke up on Easter morning to find that Easter Bunny had left pawprints and bunny fur down the corridor...

He'd also left us some yummy chocolate lollipops...

And lots of other things!

Jacob was so excited to get these space books from Easter Bunny!

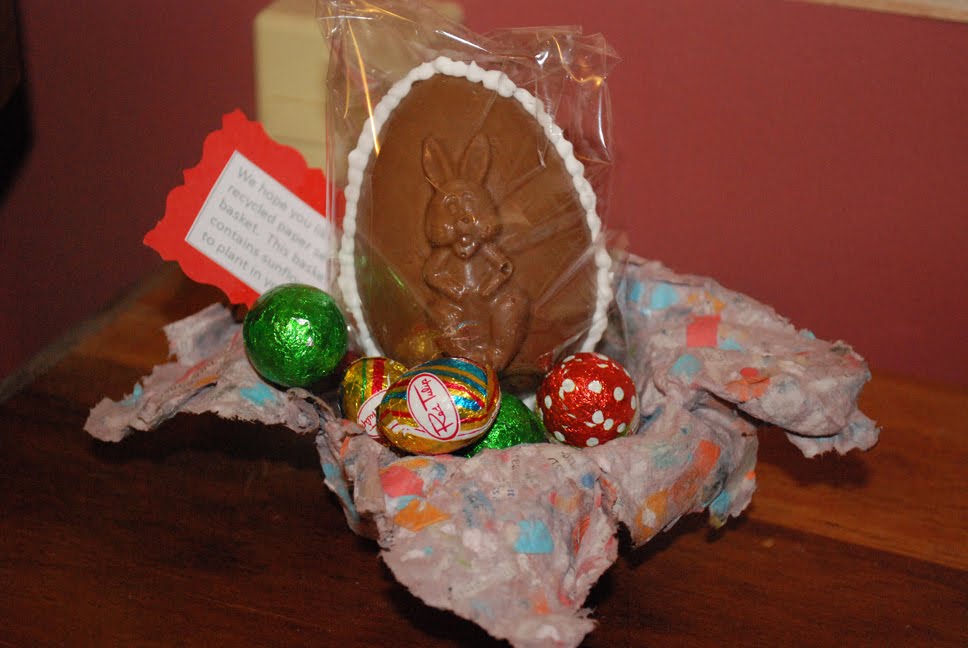
We made some special presents for family (these are seeded recycled paper baskets)

And filled them with a homemade hollow Easter egg with m&m's and jaffas in the middle.

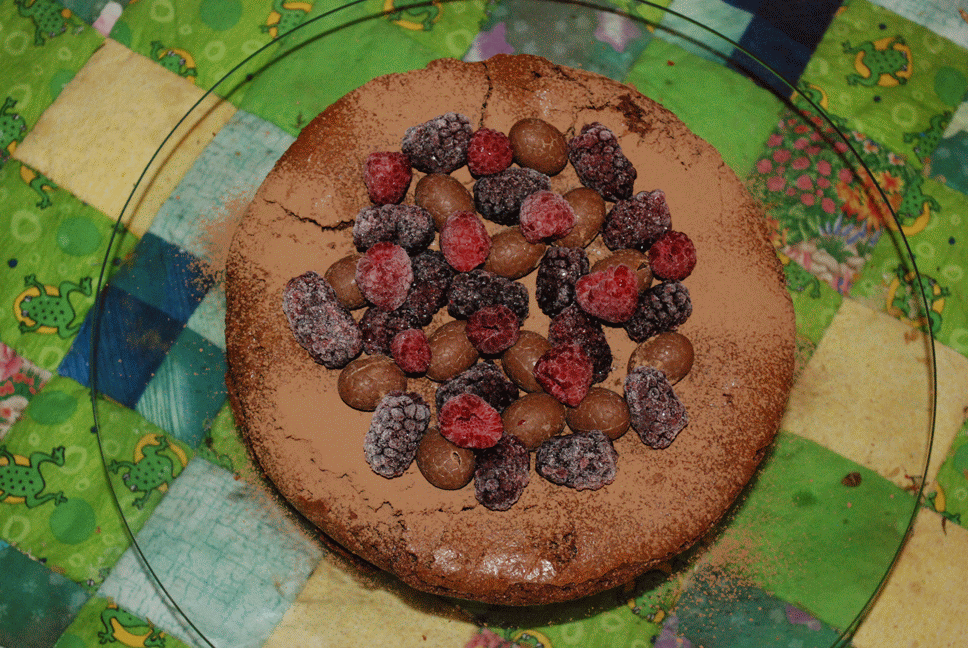
We shared a yummy lunch with all our family (including this delish chocolatey Easter cake)

And went on an Easter Hunt together!

Esme had a pocket in her dress that she used to put all the Easter Eggs she found

Jacob found lots of eggs which he counted!

HOPPY EASTER EVERYONE!

Monday, March 7, 2011

Dog Biscuits


No, they're not really dog biscuits! But we had fun pretending they were. Seeing as we've had a bit of a dog theme recently we decided to make these biscuits and cut them out in the shape of bones. The biscuits were really yummy, the recipe was similar to that of cheese scones. The kids had a lovely time making them.

Jacob grates the cheese for the biscuits

Esme adds the milk

Jacob cuts out some shapes

Esme's favourite part - eating the dough before it is cooked and licking the flour. Don't know how it can be so appetizing but she ALWAYS does it no matter what we cook!

Here's the recipe if anyone wants to make some!

Dog Biscuits


Ingredients
1 1/2 cup plain flour
2 tsp baking powder
1/2 cup grated cheese
2/3 cup milk
2 tablespoon butter

Method
1. Soften the butter to room temperature. Mix all of the ingredients to form a soft dough
2. Turn the dough onto a lightly floured surface and knead
3. Roll dough out, cut out using cutters and place on a greased tray.
4. Brush the biscuits with a little extra milk and cook in the oven at 200 degrees for 20 minutes or so.

Tuesday, September 7, 2010

The best banana bread!

Ingredients

2 tablespoons desiccated coconut
3-4 bananas
1 1/4 cups (275g) firmly packed brown sugar
1/2 cup (125g) vegetable oil
2 teaspoons gluten-free baking powder
1 teaspoon mixed spice
2 1/2 cups (200g) dessicated coconut, extra
1 3/4 cups (225g) linseed, sunflower and ground almonds (LSA)

Method

1. Preheat oven to 180 degrees. Grease loaf tin, coat base and sides with dessicated coconut. Shake out excess.
2. Combine banana, sugar, oil, baking powder and spice in large bowl; stir in extra coconut and LSA. Spread mixture into tin, smooth surface.
3. Bake break about 55 minutes. Stand in pan 10 minutes; turn, top-side up, onto baking paper covered wire rack to cool.

I tried this recipe for the first time last night and it tasted so good! The best bit about it is that it is gluten, dairy and egg-free so lots of people with allergies/intolerances will be able to eat it too!

Wednesday, September 1, 2010

Gluten-free brownies

Ingredients

150g butter, coarsely chopped
300g dark chocolate, coarsely chopped
1 1/2 cups firmly packed brown sugar
3 eggs
3/4 cup ground hazelnuts
1/2 cup buckwheat flour
1/2 cup sour cream
1/4 cup cocoa powder

Method
1. Preheat oven to 180 degrees. Grease slice tin, line with baking paper.
2. Melt butter and chocolate in medium saucepan over low heat. Add sugar, cook, stirring for 2 minutes. Cool mixture for 10 minutes
3. Stir in eggs, then ground nuts, flour, sour cream and 2 tablespoons of the sifted cocoa. Spread mixture in tin.
4. Bake for about 45 minutes. Cool in tin before cutting. Dust with cocoa/icing sugar.

Even I will eat this and I am not a huge fan of gluten free things ;)

Sunday, August 29, 2010

A kid's birthday party without the hype

Well, the sugar 'hype' that is! I have written before about how I like my kids to eat as healthy as possible. While I don't mind them having the occasional treat if they are at a party I am not a big fan of parties where the only option is unhealthy, sugary food (and lots of it too!) So, for Esme's birthday I decided to make a big effort to make it as healthy as possible. Here is what we did. Esme's party had a farm theme so everything was organised with this in mind.

Party food

Main dishes

Unfortunately I didn't really get many pictures of the party food (perhaps that's because it disappeared too quickly!) But we had ham and pineapple pizza, BBQ chicken pizza, sausage rolls, wedges, mini quiches, vol au vents, dip with carrot and celery sticks and fairy bread - yum! To drink we had fruit punch and just a couple of soft drinks.


Desserts

Ok, so we did still have some sweet things. You've got to have cake though, right?! This was Esme's pig cake. We also had fruit kebabs (with pineapple, mandarin, banana, strawberries and kiwifruit), gluten-free brownies and rice pudding.


Party games

Pass the parcel

Between each layer I put a sheet of stickers with farm animals on them. In the middle was a packet of small plastic farm animals (amazing what you can find at the cheap shops!)


Pinata


The pinata we made at home before the party using papermache. It was a great activity for the kids to be involved in too. Inside the pinata I put some more small plastic farm animals, some blowers and some party poppers. The kids seemed to enjoy the things inside the pinata, even if it didn't contain lollies!


'Lolly' bags

This was the bit I enjoyed doing the most (the things you get excited about when you have kids!) I didn't want to put any lollies in at all this year so the bags contain sheets of farm colouring pages (free down loadable ones from the web), a pack of crayons, a balloon, bubbles, sesame snaps, sultanas and a couple of homemade bikkies (cut out with farm animal cutters that Esme got for her birthday!)


Ah, so much fun! I can't wait for the next party to come around! Actually, that's Chris' birthday, I'm not so sure he'll appreciate all these efforts ;)

Thursday, July 1, 2010

Baking Bikkies

These have got to be the best biscuits ever to bake with the kids. And so simple as well! They really don't require a lot of effort. You can even make the dough the night before if you like. Basically it's two different doughs, a chocolate one and a custard one and these are layered together and rolled out to make a two tone biscuit. They taste pretty yum too!

I started off by giving the kids one type of dough each to roll while I combined the rest and started cutting out some biscuits.


Then I gave some of each dough to the kids to let them experiment with mixing them together. Esme enjoyed squishing both the doughs together to make biscuits that had swirly patterns in them. Jacob experimented with putting layers of each kind of dough on top of each other which made a nice effect once they were cooked.


Here's the recipes for the two doughs

Chocolate dough


Ingredients:
1/4 cup cocoa
1 cup plain flour
1/4 cup icing sugar
100gm butter
1 1/2 tbs water

Method:
1. Place all ingredients except for water into food processor and combine until it resembles fine breadcrumbs.
2. Add water and process until the dough just starts to come together.
3. Turn onto a clean surface and knead until smooth.
4. Refridgerate for 15 minutes.

Custard dough

Ingredients:
1/4 cup custard powder
1 cup plain flour
1/4 cup icing sugar
100gm butter
1 1/2 tbs water

Method:
1. Place all ingredients except for water into food processor and combine until it resembles fine breadcrumbs.
2. Add water and process until the dough just starts to come together.
3. Turn onto a clean surface and knead until smooth.
4. Refridgerate for 15 minutes.

All you need to do once you have made the two doughs is to layer them together, roll out and cut (I place the dough between two sheets of baking paper to make it a bit easier). Cook on 180 degrees in the oven for 15 minutes or until golden brown underneath.

And here, of course, the end result! I wonder how long they'll last ;)

Sunday, June 20, 2010

Yummy chocolate treats

Last night we had a pamper night for our ABA group. It was a lovely evening of fun and friendship. We were pampered with lovely massages and hand treatments. And what a perfect excuse to eat some yummy chocolate treats! Above is a photo of the things we made: chocolate truffles, Baileys chocolate fudge and chocolate mice. I say 'we' but actually Chris did most of the making. I only decorated the chocolate mice although that took me a while so I do think I made a contribution to the effort ;) For those of you that are interested I will share the recipes - they are all very easy to make really and taste so yum! Thank you to my sister-in-law for the recipe for the chocolate mice!

Chocolate Truffles


Ingredients:
225gms dark chocolate
3/4 cup cream
2 tablespoons unsalted butter
1 teaspoon Creme De Menthe
Cocoa (for coating)

Method:
1. Place the chopped chocolate in a medium sized stainless steel bowl. Set aside.
2. Heat the cream and butter in a small saucepan over medium heat. Bring to a boil.
3. Immediately pour the boiling cream over the chocolate and allow to stand for 5 minutes.
4. Stir with a whisk until smooth. If desired, add the liqueur.
5. Cover and place in the refrigerator until the truffle mixture is firm (this will take several hours or overnight).
6. Place your coatings for the truffles on a plate. Remove the truffle mixture from the refrigerator. With your hands, melon baller or small spoon form the chocolate into round ball Immediately roll the truffle in the coating and place on a parchment lined baking sheet or tray. Cover and place in the refrigerator until firm.

Baileys Chocolate Fudge


Ingredients:
one tin sweetened condensed milk
100gms butter, cubed
1 1/4 cup firmly packed brown sugar
2 tablespoons glucose syrup
150gms dark chocolate, finely chopped
1/4 cup Baileys

Method:
1. Line a 20cm square cake tin with baking paper
2. Combine the condensed milk, butter, sugar and glucose syrup in a saucepan. Stir over medium-low heat for 3 minutes or until sugar dissolves. Increase heat to medium-high and cook, stirring constantly, for 10-15 minutes or until mixture thickens, turns a caramel colour and leaves the side of pan. Remove from heat.
3. Add the chocolate and liqueur, and stir until chocolate melts and mixture is smooth. Pour into prepared tin and smooth the surface. Set aside for 1 hour to cool. Cover with plastic wrap and place in the fridge for one hour until firm. Cut up when firm.

Chocolate Mice

Ingredients:
150gm dark chocolate
1/3 cup cream
1 cup (125g) chocolate ripple biscuits
Silver balls, licorice, pink balls and flaked almond to decorate

Method:

1. Melt the chocolate and the cream together in a saucepan
2. Crush the chocolate biscuits until fine
3. Mix the crushed biscuits into the chocolate mix, refrigerate for no more than an hour, to firm up. If left for too long, it is really hard to dig the mixture out.
4. Roll small amounts of the mixture into balls, tapering one end to look like a nose.
5. Add thin licorice straps for a tail (pushed into the back end a fair way so it doesn’t fall out), two flaked almonds for ears, two silver balls for eyes and a single pink ball on the tapered end to make a nose
6. Refrigerate overnight

ENJOY :)

Monday, May 31, 2010

Allergy free cooking

We haven't had a lot of experience in this family with allergies and having to cook special foods. However, since starting Steiner playgroup we have happened to come across some little people with allergies. It's a bit different to an adult having an allergy. It's easy enough for an adult to avoid certain foods but with a child it's a little different. They just don't understand that they can't have something when it's set out in front of them.

At playgroup, the food we have for morning tea during the term (soup and bread rolls) are made so that children with allergies are catered for and they don't feel left out. This year we have also started having allergy free food for our end of term party. Parents are asked to bring a plate to share for these parties and so last term we had to put our thinking caps on and make some sort of food that was wheat-free, dairy-free, egg-free and nut-free. I found it quite a challenge and ended up coming up with some disgusting concoction as this was the first time I'd had to make something like this!

Anyway, seeing as it's Jacob's birthday, I had to make a cake for him to take to kinder. Even though I didn't have to, I thought it would be nice to make some sort of cake that all the children could share, regardless of allergies. So, the above pictures are the end results! Wheat-free, dairy-free, egg-free, nut-free chocolate cupcakes. I think they are actually pretty tasty for allergy free cupcakes and am very happy with the results! They have turned out to be really lovely and moist. Here's the end result:


Allergy-free chocolate cupcakes:

Ingredients:
125g rice flour
110g cornflour
50g cocoa
1/2 cup sugar
1/2 cup jam (I used blackberry)
2tsp baking powder
150g nuttelex
250ml soy milk

Method:
1.Preheat oven to 180 degrees
2. Line muffin pan with paper cases
3. Sift dry ingredients together (flours, sugar, cocoa, baking powder)
4. Add margarine, milk and jam, then beat with electric mixer until well combined
5. Half fill the paper cases with mixture and bake for 25 minutes

They taste really yummy when just cool :)

Tuesday, April 27, 2010

Homemade jams, and other things!


Here's a collection of some of the jams and other things we have made over recent months. Well, let's be honest, the jams Chris has made because I didn't do much of the cooking!! How I love having a husband who can cook! There is blackberrry, strawberry and apricot jam in this lot along with quince jelly and lemon butter. We've got quite a few jars of each type. I think it'll keep us going for at least a year (although we do give some of them away as presents so they are not all eaten by us!!)

Over the Summer, we went up to the farm and got a whole heap of fresh fruit: berries, strawberries and apricots. My Aunt and Uncle own a farm in Wandin and grow both berries and cherries. I have wonderful Summer memories of picking fruit to earn some money in my late teenage years ;) Then Chris was given some quinces by a work colleague a couple of weeks ago and thought he'd have a go making some quince jelly. According to him it's very yummy but I am yet to try it, the look and smell of those quinces as they were cooking hasn't done anything to tempt me! The lemon butter we usually make when our lemon tree is fruiting but as it hasn't started yet we had to steal them from elsewhere (not saying where ;))

Making Sushi

I'm a bit over all the usual lunches we have at the moment. It's not that they're unhealthy or anything but it was time for a bit of a change! So I decided to make some sushi (or nori-maki to be more accurate) for lunch. It was a bit of an experiment. I am well acquinted with sushi from my days in Japan but unfortunately never learned to make it myself! Jacob and I had a lot of fun trying though and I think they've turned out ok. The important thing is that they taste pretty yummy.

The start of our sushi. We chose to put carrot, cucumber, tuna and avocado in ours, with a little bit of mayonaise underneath. Then we rolled this up in some seaweed using our bamboo mat.


We laid out another piece of seaweed and spread it with some rice, probably about halfway up the seaweed sheet. We put the roll we'd already made in the middle and rolled it up again.


Voila! Fresh sushi. Oh so yummy! I'm very impressed with how they look!


Jacob was very proud of our efforts! His smile says it all I think!

Related Posts with Thumbnails